STEADICAM® IN HAND! A Brief History
By Garrett Brown,
Copyright 2008

“Everyone knows about your original Steadicam, but I don’t think people know the story behind the handheld version––which is something I’m personally interested in as I’m sure other people will be.
If you have any pictures you can dig up of the prototypes or any related material we could post on merlinresource.com, that would be fantastic....
Why did you create a handheld Steadicam?”
This e-mail from our young Jedi apprentice in the UK, landed on my screen more than a year ago. Of course I said ‘Yes.’
James, I’m embarrassed how long it has taken me to get to this, but it’s an classic ‘inventing’ tale, with all the elements (except the usual tragic ending), and I have rounded up some great old relics to show you, so here goes:
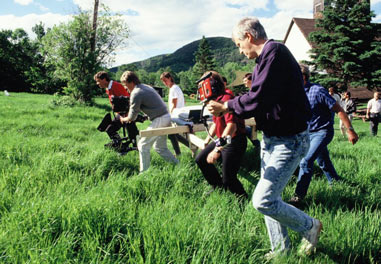
The first video camera & recorder that could be easily carried ‘in the field’ was the singular Akai ¼” reel-to-reel machine that I bought in 1972, to document the experiments that led to the Steadicam and the initial exploits of my son JB (Jonathan Brown, ASC, now age 37!)
The Akai was a wonder––it used ordinary-looking audio tape on 5” reels and was battery powered with a built-in monitor! Best of all, at the end of a thin six-foot cable, was a little C-mount black & white camera that accepted all my 16mm film lenses!
As has been related elsewhere, I bolted it onto the secret contraption we called the ‘Pole Rig’ and chased my wife over the fields and through the Pennsylvania woods with complete abandon; and then we sat down on a log and played back the astonishing results...
Fast forward... Calendar pages madly flipping...
35mmversiondemoreeltoLAdealcontractmoreprototypesrockyoscarshiningworkshops-bzzzzzt-skycam!...
...and lo! In 1984 JVC combined a VHS-C camera with a shrunk-down version of its separate recorder, and the first, all-in-one, ‘hand-holdable’ camcorder appeared!
I bought one instantly, to document the madness at Skyworks as we completed the first Skycam (the robotic, wire-borne, aerial camera that now ‘flies’ over sporting events), and our Steadicam operator pals, including the legendary Ted Churchill, came often to Philly to help out and video our earliest ‘flights’ over my former high school athletic field.
The JVC could record for 20 minutes and was fun to use: Auto-focus, auto-iris, auto color balance! For those of us used to four-minute magazines and five-man camera crews pulling focus with remote lens controls, it was liberating! A revelation! But it was also irritating to be thrust back into ‘hand-held’ shooting. We were sooo beyond that, so annoyed at the shakiness and klutziness of the moves and the twitching breathing static shots...
Something was missing. Something we wanted! (a wheel?, an ipod?) but couldn’t even articulate, until the ‘gap’ is recognized and gets filled––and ever after seems so obvious!

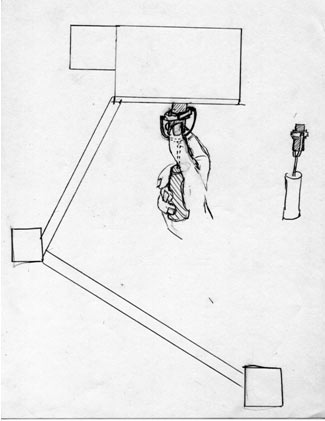
In November of 1986 my friend Damon Sinclair was preparing to shoot ‘The Last Hunt,” his documentary about a grand old Irish fox-hunting family, and since he was an accomplished horseman, Damon asked me if there was any way he could film the jumps from the rider’s perspective. He owned a couple of Ken Richter’s tiny and delicate 16mm EMP (‘Envelope Minimum Possible’) cameras, which could be held in one fist, but his equestrian shots were violently shaky. I drew up a miniature version of my first ‘Pole rig’ with an added pan bearing and some isolating foam at the C.G. For viewfinding, I taught him the old Steadicam workshop ‘stick’ gag, for use if ones monitor craps out!

Humans have the useful ability, by some magic of perspective, to know just where a waist-high revolver or finger or stick is pointing, so if you tape pencils to the four corners of a matte-box and ‘bore-site’ them toward the extremities of your frame, uncannily, you’ll know what’s just ‘in’ and what’s just ‘out’ of shot!
We got the rig built and Damon tried it out on horseback, pronounced it ‘usable’ and took off for Ireland. (Look closely at the above photo to see his viewfinding ‘pencils’ in action!) When he got home with the footage, I was pleased to see that our gizmo had worked! It was amazing and powerful and, in context––swooping over broad ditches and five-foot gates––remarkably steady!
Finally, in 1987, after a particularly unstable attempt at a ‘walking’ shot, I sat down and stared and stared at my JVC and began to sketch a ‘miniature’ Steadicam for camcorders!
What would it look like? Feel like? What ‘Steadicam’ components were indispensable? Of course it would have to be cheap. Small. Light! Easy to use. (at least compared to a unicycle, or a violin!)
The cost and complexity of the existing arm/vest technology might be prohibitive. Could the thing be hand supported? And what about viewfinding? How could we ever find an affordable monitor that could be used outdoors?
The essence of the Steadicam, at minimum, is expanding the useful masses and gaining access to that mother-of-all-stabilization ‘points,’ the C.G. (‘center-of-gravity’), where a three-axis gimbal can isolate against the angular bumps that plague handheld shooting.
My JVC camcorder weighed five lbs. The gimbal would need to stay up close to the camera, so a minimum amount of weight, a minimum distance down below, could balance it.
And the gimbal handle should not be alongside the central post, as in all previous Steadicams, because that would impose extra torque on the operator’s hand and wrist. The handle must be below the gimbal, but then how do we pan and tilt?
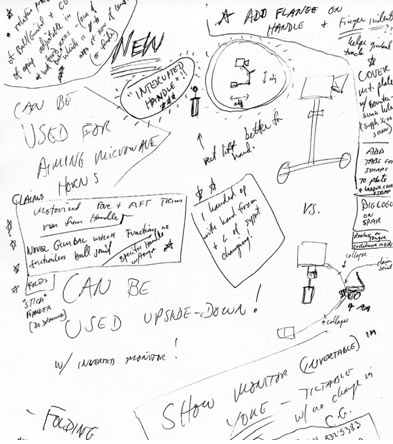
Circled in my early sketch––with three stars yet!––the idea for the ‘Interrupted Gimbal Handle’ arrived early one morning like a thunderclap. Two discrete handle segments with a gimbal in between––one isolated below for support, the other attached above, for panning and tilting.
I sketched a miniature three-ring version of the conventional sort with the operating surface awkwardly caged inside, but chucked it and started over; and one-by-one all of present features were dreamed up and filled in: “It” would be adjustably counterweighted, adjustably trimmed in three axes, with two handle segments isolated by a ball joint for a gimbal. I was ready to build a prototype.
I called Ed Digiulio, owner of Cinema Products Corp, my Steadicam licensee, and pitched him on the concept and he enthusiastically agreed to build the parts from my drawings. In one frenzied week, I designed the ultra-light vernier stage (now ‘reborn’on the Merlin) and sketched the ball-joint gimbal and Ed began fabricating its components.
The monitor issue was daunting. The big Steadicam used an 18,000 volt television chassis, jacked up to get more brightness out of its two-inch, green-filtered screen, but an miniature version seemed inconceivable.
When you are out there, questing for a solution ahead of the pack, the universe will sometimes oblige you. Someone, somewhere will start making what you need, and you’ll find it––if only because you are looking! In this case, a novel little Japanese LCD TV turned up in one of those cluttered electronic emporiums in Times Square. Its tilt-up screen was translucent, and you could see the reversed, top-lit image from underneath by means of a mirror, so the brighter the sky, the brighter the picture.
In sunlight it was sometimes great, sometimes unusable, depending on the angle, but I bought one and installed it and could at least intermittently see my framing.

Worried that a single mass down below might be somehow in the way, I briefly swerved off the road with a two-tailed, ‘dowser-like’ version, which was duly assembled out of curved aluminum tubing and tested in secret, and it sort of worked. But the ‘dowser’ arms bumped into my chest and were clumsy in close quarters (check out my expression in the polaroid!), and its ball joint gimbal was way too sticky, even lubed with graphite and teflon and olive oil and anything else we could think of; so the handle had to be constantly twitched to prevent ‘standing friction’ and was soon given the elbow (along with my ridiculous dowser arms).
On the plus side, the video looked great and had I worked out the ‘two-handed technique’ in miniature––one hand supporting the lower handle and the other barely touching the ‘guide’ ring with two-fingers and a thumb, and was eager for a second round.
Take two. My still-nameless stabilizer was rebuilt from the stage on down with the single lower arm we use to this day, and my new, ultra-compact, six-bearing gimbal replaced the hated ball joint.
A week later, I shot a family Easter egg hunt at our country place, and after everyone went home, made a series of moving, gliding shots up and down and across the steep lawns, and circled around and around Ellen’s Saab as she gave it a wash at twilight.
After dinner, we put the tapes in the adaptor, one at a time, and I finally got to see what had been accomplished. My little video finder had been a disappointment. It worked at times, but only when my head was square to both the mirror and the screen. The results, however were stunning––one glassy smooth move followed another, as if a much larger mass was in powerful, inexorable motion! It seemed to work as well as the full-sized Steadicam, and for the second time in my privileged lifetime, I had the eerie and exhilarating conviction that what I held in my hands was unique in the world... and valuable! At leastI would never again have to ‘hand-hold’ a camcorder!
From that moment, the story accelerated rapidly and acquired a somewhat surreal gleam. Ed DiGiulio boosted the back-light on a small black & white LCD, and filtered the image through the same “OCLI” coatings that reject sunlight on the big Steadicams and we judged it to be ‘good enough’ which was a real triumph in that primitive era.

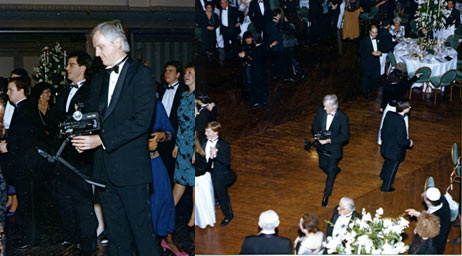
I left for Maine to conduct the first-ever ‘Masters’ Steadicam workshop in the spring of 1988. The best operators in the world assembled in Rockport to test new ideas, compare gear and invent off-the-wall equipment and techniques; and I documented it all with my little prototype, going through dozens of tapes and scores of alkaline batteries to keep Ed’s little monitor glowing (until it expired in a puff of smoke).
My colleagues all agreed to keep the proceedings a secret, and at the end of the week I played them the video I had shot with my prototype––of the great cinematographer, Vittorio Storaro, prowling intensely around his hotel suite in Manhattan and lecturing us for an hour on the Art of Operating.
Back in Los Angeles, there was growing excitement at Cinema Products Corp. My old friend, Jac Holzmann, former president of Panavision, heard about this latest little invention and offered to round up some investor friends and buy the company, in order to go after the vast new consumer video market by selling huge numbers of miniature Steadicams.
It was decided to make them out of plastic , so that gazillions of components could pop out of molds for pennies each and be assembled ‘in seconds’ with unskilled labor!
I argued strenuously against this idea, and urged CP to build them like my prototype—out of aluminum and steel––which would be elegant, rigid and precisely adjustable, plus they could be made immediately at the factory and sold to high-end ‘prosumers’ all over the world.
I was overruled.

Jac bought the company, and we engaged Richardson Smith, the famous industrial design firm, to sculpt the plastic shapes. I traveled to Ohio to consult on issues of form and balance for the world’s dozen known camcorders, and returned frequently to inspect their futuristic (c. 1990) designs. I hefted their wobbly models, machined out of ‘RenShape material and was photographed with black-painted versions which, they assured me, would be ‘as stiff as metal’ if formed from glass-filled ‘Ryton’
Richardson Smith fulfilled their assignment professionally and I enjoyed working with Gerry Skulley, their gifted designer, but our problems multiplied expensively when the drawings finally came back to LA and we contemplated the elaborate, ‘multi-gated’ dies needed for molding––each as costly as a Mercedes!
Although CP had big dreams, we were small potatoes in the world of high-volume plastic parts. Big-time molders could barely be bothered to ‘run’ our mere thousands of parts, or to help us to correct die errors that made this bit need sanding, gluing and fitting before it would ‘mate’ with the adjacent bit. So few of our parts were ever ‘popped together by unskilled labor’ for any of the tens of thousands of ‘Steadicam JR’s’ that were assembled over the next two decades!
Our naming lists had included such loopy monikers as: Move-ee, Floater, Liberty, Limelite, Upstart, Mustang, Mite, Stealth, Ace, Steadishot (!), Runner, Solo, Seeker, Pro (!), 4U, Spree, Pixelle (blagh!), Hummer (Feh!!), Arrow, Flyer, Jazz, Levelcam, Liftoff, Smoothshot, Steadeo, Wizard (!), Junior (!!), and even Brownie (!!!), but Steadicam JR (not to be pronounced ‘junior’) was the winner.

I wrote a huge patent application to protect the original prototype, shown earlier in figure 2, and numerous variations––like the above figure 12, which recently evolved into the excellent Steadicam Pilot™ !
I also wrote the elaborate JR manual and helped with its fancy instructional video, and even went out in secret and shot weddings for a videographer friend to learn how it should be done. (I was busted by the father of the bride. He said, “You’re a ringer, right? I can tell by the fancy shoes! The real ones always wear ‘cop shoes’ for comfort”)
The JR debuted at the NAB show in 1990 to great acclaim, and was a revolutionary advance for camcorders, cherished by thousands of videomakers ever since.
I was always proud of the JR, and used it myself to good effect, but even glass-filled plastic is not quite as rigid as metal, and trim adjustments are consequently harder to maintain. I dragged out that little old little aluminum prototype, and argued several times over the years––particularly as the original JR molds were wearing out, and newer, lighter camcorders could no longer be balanced––that it was time to finally re-engineer and release the original version––for modern cameras of all weights and sizes that now came with their own, high-quality monitors.
Finally, in 2003, my friend and new licensee, Steve Tiffen, cut me loose to perfect the ultimate small Steadicam for today’s camcorders, and the project that resulted in the ‘Merlin’ was at last underway!

‘Caliper hinge’ attempts that didn’t make the cut!
Tony Sacksteder and I invented and patented its new ‘Folding Caliper Hinge’, and added a set of elegant stainless steel weights, so it would fly a huge range of camcorders––from tiny ½ lb (.23kg) memory-card mites to big five lb (2.5kg) HDV’s––and we made it ultra-light, stiff and precise, with an quick-release dovetail that instantly coarse-adjusts balance or pops onto a tripod adaptor. Chief engineer Rob Orf brilliantly engineered it for production, and it was done!
We exchanged yet another comical series of ‘name lists’ and ‘Merlin’ was the winner. Though partly inspired by the swift and elegant little Merlin hawk, it was the magical connotations of the name that aroused our marketing guys, and the Steadicam Merlin ® made its auspicious debut several years ago––to even more acclaim than the old JR––and I got that eerie, exhilarating feeling once again when I finally held in my hand that re-invented, reborn clone of my sweet little prototype... a mere 16 years later!*
(...and the Merlin Arm & Vest? Well that’s another story!)

The first Merlin prototype––note the original bronze weights!
HOW TO INVENT, by GB
For those interested in the process, I have appended my ‘How to Invent’ list, and you will observe that the ‘JR’ project followed the form exactly, as the rigors of weight and size and my previous hard-earned Steadicam chops led me fairly quickly to the basic form:
- Identify some object (or method or technique) you want or need that is missing—even if its absence has long been taken for granted.
-Don’t do it just to make money – Invent something you want for yourself. (If you want it then probably someone else probably wants it too!)
- Try to imagine all the ways that it might look, feel or operate if it did exist, and make sketches, diagrams or primitive models.
- ‘Operate’ all the versions, at least in your mind, and select the most promising to try out or build.
- Deconstruct the winning version on paper, right down to its hypothetically disassembled parts.
- Acquire whatever components can be purchased and hire experts to make the parts that are unavailable.
-You may have to spend a little money – but do so where it really counts. Don’t overspend. You’ll be surprised how cheaply you can get simple parts machined.
- Assemble the thing and give it a try.
- Improve it or start over (or celebrate!) as appropriate––for as long as it takes!
*Persistence is the key.
-Keep the thing a secret (until you can secure patent rights), or you may compromise your future foreign patent rights. Use ‘non-disclosure agreements’ or at least personal promises of confidentiality from friends and family, and tell your colleagues and hired workers that it isn’t personal... just business!